Friday 23 December 2016

Netgear Nighthawk X4 R7500 router steps to change the IP Address

Login To The Netgear Nighthawk X4 R7500

To get started configuring the Netgear Nighthawk X4 R7500 LAN page you need to login to your router. If you are already logged in you can skip this step.
To login to the Netgear Nighthawk X4 R7500, follow Netgear Nighthawk X4 R7500 Login Guide.
our call at toll free number 1888 479 2017 for USA/ 1800 987 893 for Australia

Change the LAN IP Address on a Netgear Nighthawk X4 R7500


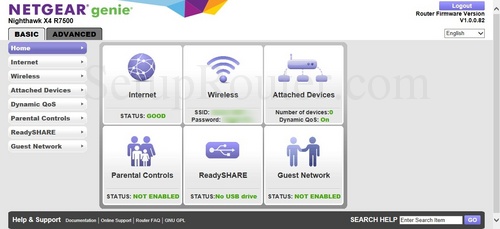
 On the Home page of the Netgear Nighthawk X4 R7500 router. To change your IP address go to the ADVANCED tab near the top of the page. From there click Setup and then LAN Setup below that.

Configure the LAN section of your Netgear Nighthawk X4 R7500


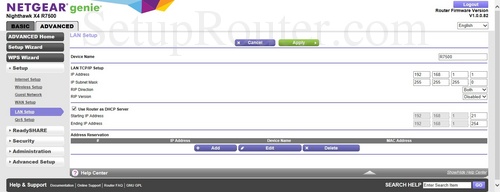
On this page you have the option to change your router's IP Address10.0.0.1
Below that is the option to change your IP Subnet Mask. Leave this alone. It needs to stay at 255.255.255.0
That's all there is to it. Just be sure to click Apply before closing the page.

Possible Problems when Changing your LAN IP Address

 You will lose your Internet connection when you apply these changes. Your router may reboot and require a couple of minutes to start responding again.
some computers might need to reboot.
If face issues to change IP address than easily you can call our tech support team to take care of that issue, 
Our certified experts can solve all types of Netgear Router related problems including installation, upgrade, uninstallation, configuration, settings or customization.

Call us at our toll free numbers:
USA : 1888 479 2017
Australia: 1800 987 893

or else you can log on to our website :

Friday 16 December 2016

SET UP WIRELESS SECURITY FOR NETGEAR ROUTERS


WANT TO CHANGE YOUR NETGEAR ROUTER SETTING LET THIS STEP HELP YOU OUT.

  1. From a computer connected to your router, go to 192.168.0.1

    192.168.0.1 entered into browser address bar
  2. Enter the details below when asked to log in

    User name: admin
    Password: password

    Enter username admin, and password as password.
  3. The Netgear's admin pages will open
    Router admin pages
  4. If the router starts checking for new firmware, click Cancel
  5. Select Wireless Settings from the Setup menu

    Wireless Settings menu
  6. The Wireless Network field is where you'll find your wireless network name

    - Name (SSID): You can change this to something new and personal to you
    - Region: select Europe
    - Channel: select Auto
    - Mode: select Up to 150Mbps

  7. In the Wireless Access Point field

    - Check Enable Wireless Access Point
    - Check Allow Broadcast of Name (SSID)
    Don't check Wireless Isolation


  8. In the Security Options field, select Mixed WPA-PSK+WPA2-PSK


  9. In the Network Key field you'll find your security key or password
  10. If you'd like, you can enter a new security key for your connection

    This should be over eight characters and can be made up of upper and lower case letters from a-z and numbers 0-9.


  11. Click Apply - any changes you've made will be updated
  12.  If you face any issue at above steps than please let us know. You can fix your technical issue for your netgear router through our technicians who are professional and Microsoft certificated . At netgear tech support we provide All router issues instantly. Let us help you out call us at our toll free numbers 
  13. USA : 1888 479 2017
  14. UK: 0800 368 9229
  15. you log on to our web site at:  https://www.icognix.net/netgear-router-support/
  16.   Were these steps usefull to you let us know please leave comments.

Friday 9 December 2016

Wireless Extender (Netgear WiFi Range Extender – WN2000RPT) AT&T U-verse Router (Windows and Macintosh)

Using Wireless Extender (Netgear WiFi Range Extender – WN2000RPT) on AT&T U-verse Router (Windows and Macintosh)

12APR
There are tricks in order to use wireless extender on AT&T U-verse router.
Just connecting the extender and complete the extender’s configuration will only give you access to the network, but not the Internet access. This means, you can access the computer within the network, but you can’t access the Internet. 


  1. Go to Netgear configuration manager.

  2. Turn off DHCP feature on the extender by going to “IP Address Setup” and use static ip address.
    On “IP Address” field, specify the ip address you want for the extender. Remember this ip address.
    Do note that the “Gateway IP Address” and “Primary DNS” are the ip of your AT&T U-verse router. By default, the AT&T U-verse router’s ip is 192.168.1.254.
  3. Click Apply button to save the setting.
  4. Now, configure your computer’s network setting to point its default gateway and primary dns to the extender’s ip address.
  5. On Windows, open up the network adapter setting.
  6. Display the properties.
  7. Properties on “Internet Protocol Version 4 (TCP/IPv4)” or something similar to that.
  8. Define ip address and dns server address.
    On “IP address”, specify ip address you want for this computer.
    On “Default Gateway” and “Preferred DNS server”, type in the AT&T U-verse router’s ip address. By default, the AT&T U-verse router’s ip is 192.168.1.254.
  9. Go back to network adapter setting to restart the connection (disable and then enable again).
Mac users: you can do the same thing: point your Mac’s network default gateway and dns server address (router) to AT&T U-verse router’s ip address.
To access your network setting, go to System Preferences > Internet & Wireless > Network > Advanced > TCP/IP.
The side effect (not sure if it’s good / bad…) of using this technique is your AT&T U-verse router will assign a ‘dynamic’ ip address for the extender. What I meant by ‘dynamic’ here is, the ip address will constantly change depend on what device is making connection to AT&T U-verse router. So for example, you have specify the extender ip address as 192.168.1.1 in the extender’s configuration manager and you have 2 devices connecting to the extender with ip addresses as 192.168.1.5 and 192.168.1.6 respectively, the extender ip address in AT&T U-verse router will change from 192.168.1.1, 192.168.1.5 or 192.168.1.6.
IF STILL THERE IS A ISSUE THAN PLEASE CALL US AT 1888 479 2017.
we have the most experienced and certified Netgear tech support professionals onboard. Our experts offer customized solution to help you overcome the router issues. They are available round the clock over phone, email and web chat for all types of Netgear technical support.
OR LOG ON TO OUR WEBSITE:  


THANK YOU.